Back to mods index.

The Air Tech 2000 is a mediocer gun when unmodded, getting ranges of up to 30'. Four barrels, manually turned produce a slightly high rate of fire. A basic, unmodded Nerf gun.
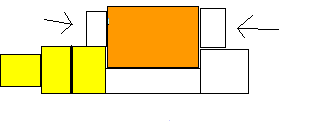
The clip
Overview:
This will make an Air Tech 2000 have a 3-round breech magazine, and be capable of ranges up to 120Æ. All steps have been thoroughly tested.
Difficulty:
3 out of 5
Materials:
-Air Tech 2000
-12ö Įö of CPVC, cut into 4ö and 8ö
-1 Įö CPVC coupler
-4ö of PVC, cut into 1ö, 1ö, and 2ö
-A Dremel multi-tool
-Sandpaper
-2 pieces of 2öx1.6öx~1mm balsa wood
-Hot glue gun with plenty of hot glue
-A Philips screwdriver
-Black Sharpie
-Hammer
-Pliers
Procedure:
AT2K:
Take apart the Air Tech 200. Slide out the pump, and plug the overpressure release valve with hot glue. Set the shaft aside to dry.
Take all of the screws out of the Liquitron Power gauge and empty the liquid. Screw it back together, making sure that the rubber seal is in place.
See those little pieces that make sure the front of the air tank doesnÆt wiggle on each side of the case? Take your pliers and rip them off.
Take the turret out. Do whatever you want with it; itÆs not needed.
Keep your gun apart.
Action:
Take the 4ö piece of CPVC and hot glue the coupler onto it. Allow to dry.
Take the 2ö piece of PVC and using the largest Dremel sanding bit, sand out the inside so that a piece of Įö CPVC can slide through easily.
Switch the sanding bit on the Dremel to the circular hard disc.
Using that, cut the PVC in half lengthwise so you end up with 2 pieces that are 2ö long. Set one aside.

Hot glue the other piece to the CPVC coupler, making sure that there is no glue in the way of a piece of CPVC fitting into the coupler. Allow to dry.
Take one of the 1ö pieces of Įö PVC and, switching Dremel bits back to the large sanding one, sand out the inside so that Įö CPVC could fit easily through.
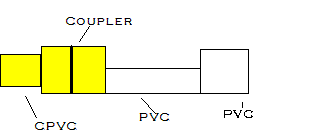
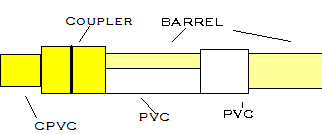
Attach this to the end of the 2ö piece that is attached to the coupler. To ensure straightness, slide the 8ö piece of CPVC through so that it attaches to the coupler, NOT GETTING ANY GLUE ON IT. Allow to dry.
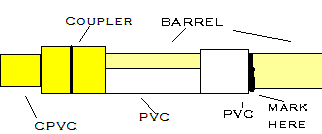
At the end of the PVC, take the sharpie and draw a line around the CPVC that marks where it meets the end of the PVC. Remove the CPVC.
Take your remaining 1ö piece of PVC and hammer it onto the Įö CPVC until it reaches the black sharpie mark. (When you put the CPVC back into the action, it should still make a seal with the coupler.)
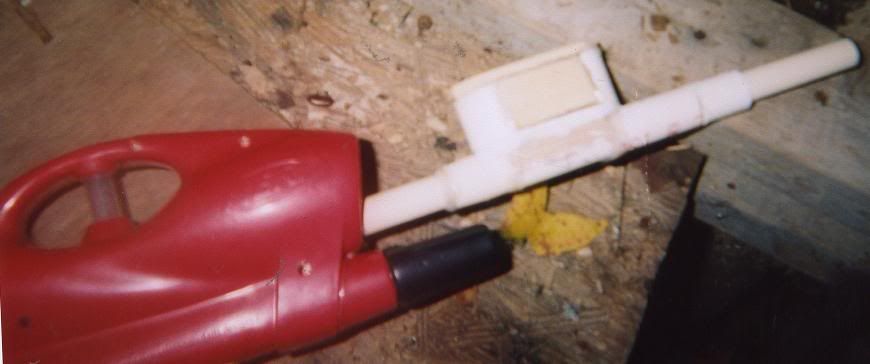
Your action is complete.
The Magazine:
Take the CPVC out of the action and set it aside.
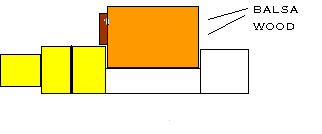
Take your two pieces of 2öx1.6öx~1mm balsa wood and hot glue them straight between the coupler and 1ö PVC. Allow to dry.
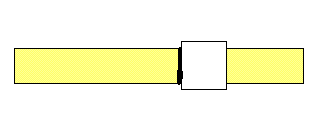
Take the piece of 2ö PVC that you previously Dremeled and cut in half lengthwise, and switch Dremel bits back to the cutting-disc. Cut the piece in half so that you end up with two 1ö pieces of PVC that are cut in half.
Glue one to the balsa wood and coupler, and the other to the balsa wood and PVC. Allow to dry.
Turn the action sideways so that one piece of balsa wood is down and the other is up; both are horizontal.
Take your hot glue gun and cover the balsa wood with hot glue. Allow to dry.
Flip the action and repeat with the other side of the balsa wood. Allow to dry.
Completion:
Take the airtank of your AT2K and cover this part with hot glue.

Slide the end of the action with 2ö of CPVC onto it, and smother the connection with more hot glue, making sure that the barrel is pointing STRAIGHT. Allow to dry.
Put the airtank/pump/trigger+ action back into the AT2K case.
Screw the case together.
Point the gun so that the barrel is facing you.
See the part right above the pump handle where the CPVC and AT2K touch?
Align the barrel and smother that part with hot glue. Allow to dry STRAIGHT.
You are done! To work:
Pull the 8ö barrel forward.
Load three 2ö darts into the action (it is advisable to make some type of removable cap to cover the action to darts donÆt fall our when you move).
Pull the 8ö barrel back, chambering a dart.
Pump, fire.
Pull the 8ö barrel forward then back.
Pump, fire.
Repeat.
Finished Product:
**A Sinfil Production***
-SInnER-